

Part 1 of Golf Course Architecture 101 explains the key concepts of playability, width, options, and strategy. In this addendum, we explore two outstanding examples of those principles in action.
Streamsong Red – No. 15 – Par 4, 486 yards
-
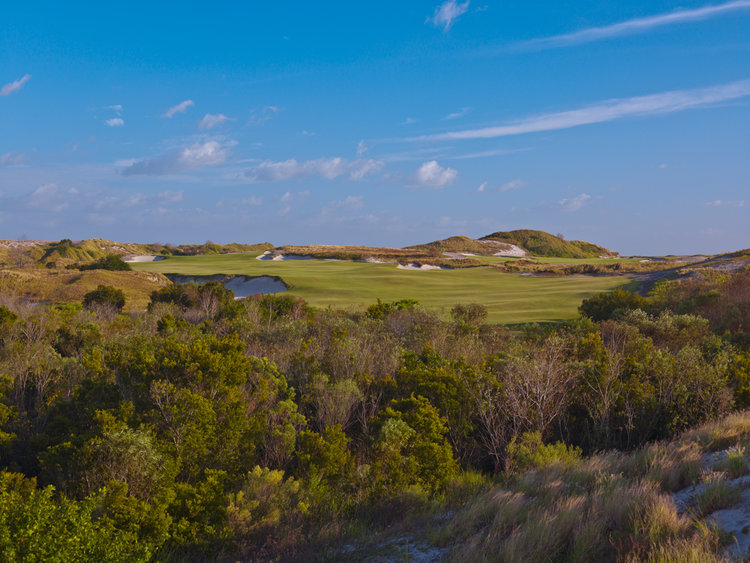
The 15th hole at Streamsong Red. Photo credit: Andy Johnson
-
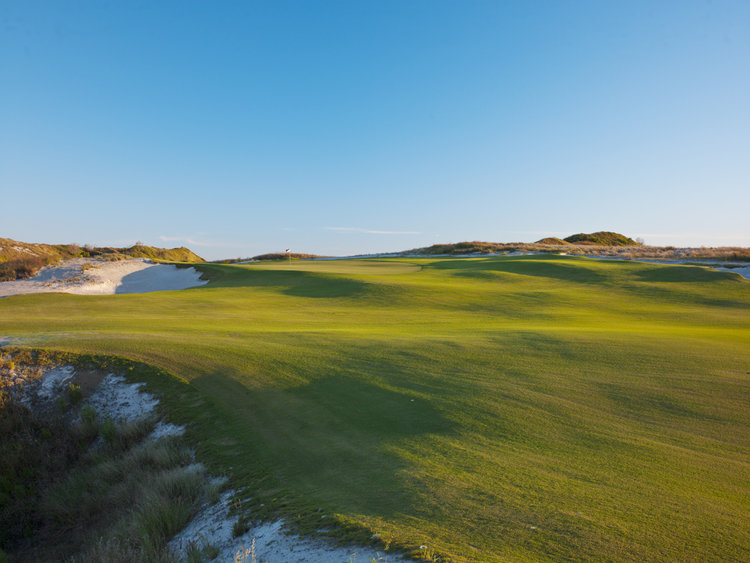
The 15th hole at Streamsong Red. Photo credit: Andy Johnson
The 15th at the Bill Coore and Ben Crenshaw-designed Streamsong exemplifies how width and a single dominant hazard can create simple yet compelling strategy. The most memorable feature of the hole is the nearly 30-foot-deep fairway bunker that guards the left side of the fairway. Coore & Crenshaw paired that ferocious hazard with a green that tilts severely from right to left.

One of Coore & Crenshaw’s trademarks is their expertise at defending the ideal angles into their greens. On the 15th at Streamsong Red, the preferred line (option A above) is along the left edge of the fairway. This line shortens the hole significantly and provides a good angle across the slope of the green. But of course Coore & Crenshaw have defended this garden spot with the treacherous bunker. Any miss left leads to a pitch-out.
Option B is much safer. Stay short of the bunker and find the right half the ultra-wide fairway, and you’re good. This wide landing area offers kindness to the average golfer, who is unlikely to hit the green in regulation anyway. But better players who bail out to the right may be frustrated by the long approach to a putting surface that runs away from them. They’re expecting to reach the green with their next shot, and they will find that task difficult.
No. 15 at Streamsong Red shows how a long par-4 can be simultaneously playable, challenging, and packed with options and strategy.
Sweetens Cove Golf Club – No. 5 – Par 4, 290 yards
This short par 4 at Tad King and Rob Collins’s nine-holer is eminently playable. At its widest point, the fairway is 100 yards across, making it easy for everyone to stay in the short grass. Also, the lion’s mouth green funnels balls to the middle, which means you can play away from the nasty pot bunker.
Yet for the player hoping, or even expecting, to make birdie, King-Collins offer plenty of options with varying degrees of risk. These strategic possibilities are dictated by two main factors: the pot bunker and the hole location. For this exercise, let’s use the front-left pin.
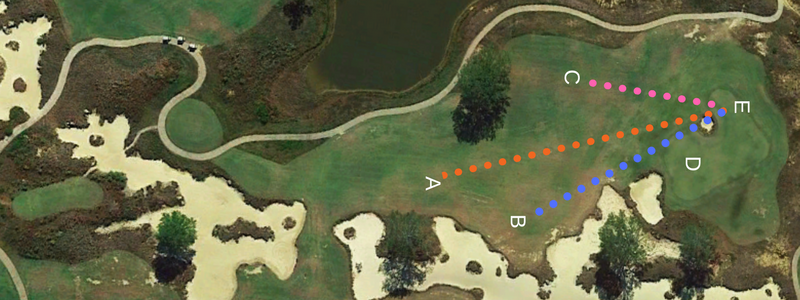
Option A: A mid- to long iron straight up the middle. From there, you will have a longer approach, and your line to the flag may be interrupted by the pot bunker. But it’s a safe play, especially for those who don’t believe they can reach the green but have confidence in their full wedges.
Option B: A long iron or hybrid to the widest portion of the fairway. Safe, but the tradeoff is a poor angle to the front-left pin. To get it close, you would have to take on the bunker with a high wedge or punch a low runner that uses the green’s contour to feed the ball around the bunker and toward the hole.
Option C: The riskiest layup yields the best angle. A waste area and a tree threaten misses to the left, but if you execute this tee shot well, you will have a short wedge unobstructed by the pot bunker.
Options D and E: Fire away! But even in attempting to drive the green, you have options. D is safer: the opening of the green on the right is fairly wide, and the contours tend to funnel the ball toward the hole. But a right miss leaves a long recovery from one nasty bunker over a nastier one, and a left miss leads directly to the latter. If you end up short, the ensuing pitch is quite delicate. E is the high-risk, high-reward Tiger line. It could result in either a short eagle putt or a variety of impossibly short-sided chips and pitches.
The 5th at Sweetens Cove is exciting because there is such a wide range of potential outcomes. Eagles are possible and birdies attainable, but the treacherous, cleverly placed hazards can easily produce double bogeys or worse. Often the more powerful and aggressive player will find himself in a heap more trouble than the short, cautious one.
As both this hole and the 15th at Steamsong Red demonstrate, width and challenge are not mutually exclusive. Rather, playable holes that present options and risks tend to be more enjoyable for players of all abilities.
For Part 2 of Golf Course Architecture 101 (on routing, variety, and naturalness), CLICK HERE.
