Breaking down the 17th at TPC Scottsdale
Will Knights dives into TPC Scottsdale's short par-4 17th and looks at the different options and strategies it gives to players


The raucous scene at the Waste Management Phoenix Open is upon us. Large crowds, fantastic weather, a great field, and a final stretch that is built for drama. It is one of the most well-run tournaments of the year and almost always produces an exciting finish.
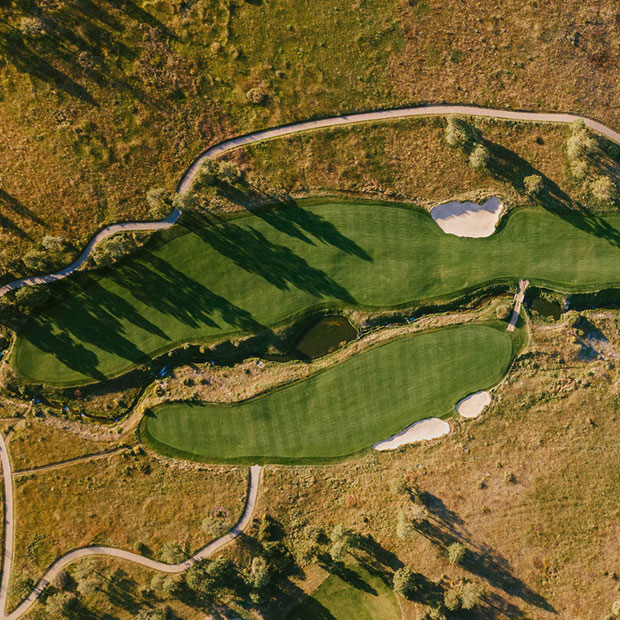
Tom Weiskopf built TPC Scottsdale (especially the back nine) with the intention of creating a good product for the PGA Tour. The result was a course that yields a lot of birdies without a lot of strategy. Players are not typically penalized for hitting it off-line and the preferred lines of play don’t always lead to better angles. The 17th hole is an outlier as it requires the player to put the ball in the correct position to make a late birdie or eagle.
At roughly 330 yards, this short par 4 plays as one of the easiest holes every year. Players know they need to play this hole well to contend. Since 2010, the winner of the tournament has averaged two under for the week on 17. Water comes into play on the left, roughly 295 yards from the back tee. In the warm Arizona climate, it’s reachable for every player in the tournament. There is also a pot bunker about 35 yards short of the green that requires a 275-yard carry. While these hazards catch your eye off the tee, it is the pin position that determines the correct play.
Historically the 17th hole has four main pin positions; front left, front right, back left, and back right. While each pin plays differently, the strategy can be simplified to the left vs. right and front vs. back. Over the last three years, players have gone for the green 86% of the time when the pin is on the left while only going for it 56% of the time when the pin is on the right. Players also have made birdie or better 53% of the time when the pin is in the front half of the green and only 33% with pins on the back half.

To figure out what determines whether players go for the green or not, look no further than the layout of the hole.The left side is flanked with water while the right has a slope that falls off into a collection area. When the pin is on the front left, Position B becomes very attractive. Players know they can miss right and still have a straight-forward chip at pins on the left side. This leads to a high percentage of players going for the green, missing right if need be.
When the pin is located on the right half of the green, Position B is much less enticing. The slope on the right side and lack of green to work with make the chip extremely difficult to get close. Instead, players aim for the center or left side of the green (Position A). Water lurks if they get too aggressive, so they tend to lay back ever so slightly. This leaves them in the best location to get up and down for birdie.
Comparing each of the pins individually can help us see why there are so many more birdies made on the front locations.
Front Right Pin (FR)
The front right pin is the easier of the two pins on the right side of the green. I mentioned above that the collection area to the right of the green makes it tough to get up and down for birdie. While this is true, the front of the green is more accessible from that area than the back is. The front position is flatter and gives players a better chance to make birdie. It is also the easiest position when trying to drive the green, as players can aim away from the water.
Front Left Pin (FL)
The easiest of all pins on the green is the front left location. Over the last three years, about 60% of players made birdie or better here. That is amongst the highest percentage of birdies made on any par four on the PGA Tour. Nearly everyone takes a shot at going for the green here as a miss right or short leaves an easy up and down for 3. Players who hit it right at the pin also have a relatively simple up and down for their birdie.
Back Right Pin (BR)
From above the back right pin doesn’t look very difficult. What you can’t see is the little shelf that sits in this corner, making it very hard to get the ball close. Misses to the right off of the tee make it nearly impossible to keep it on the right level. Players short of the green have a better angle but still must hit a solid chip to leave a makeable birdie.
Back Left Pin (BL)
The most sinister of them all is the back left pin. This location has been used on Sundays for 3 of the last four years, and 5 of the last 9. With only about 29% of players making birdie, it is easily the most difficult pin on the green. This portion of the green is only 11 yards wide at its broadest point. Adding to the difficulty is the slope of the green. From the middle, the green slopes back to this area. This means that approach shots that come up short will leave fast, downhill birdie putts. The easiest way to score on this hole is to drive the green and leave your eagle putt just past the hole. This will leave an uphill putt for birdie. All in all, this is a very difficult pin.
As with any good short par 4, there isn’t a single strategy that makes every area of the green easily accessible. Players must take into account where the pin is and play the correct line off the tee. Driving the green isn’t always the best play either as players can find themselves blocked out by the bunker when the pin is in the back. With 18 being a historically tough hole, this hole is probably the last chance for a birdie. Watch to see if the leaders* can play 17 correctly and pick up a birdie on the way home.


Leave a comment or start a discussion
Engage in our content with thousands of other Fried Egg Golf Club Members
Engage in our content with thousands of other Fried Egg Golf Members


Architect Tom Mackenzie on Royal Birkdale Changes for 2026 Open Championship

Comparing, Contrasting Upcoming Open Championship Venues
New Schedule, New Venues: PGA Tour Host Course Wish List

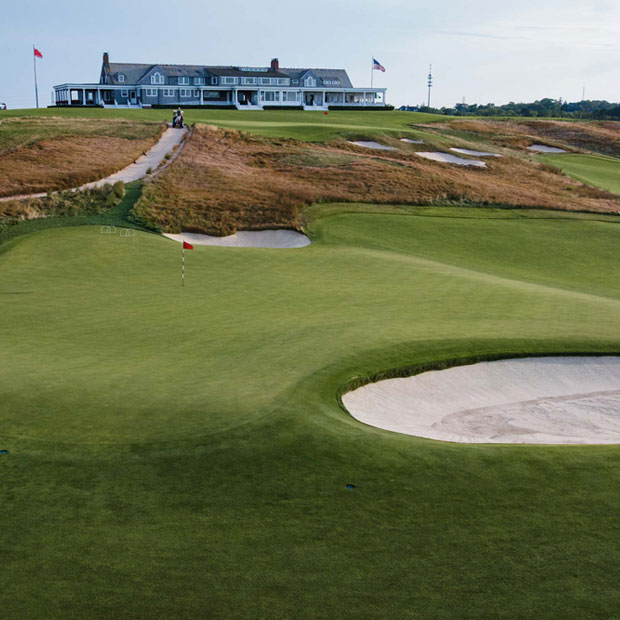
Every Hole at Shinnecock Hills: History, U.S. Open Strategy, and More
Every Hole at Shinnecock Hills - No. 18, Home

Every Hole at Shinnecock Hills - No. 17, Eden
Get full access to exclusive benefits from Fried Egg Golf
- Member-only content
- Community discussions forums
- Member-only experiences and early access to events
Leave a comment or start a discussion
Lorem ipsum dolor sit amet, consectetur adipiscing elit. Suspendisse varius enim in eros elementum tristique. Duis cursus, mi quis viverra ornare, eros dolor interdum nulla, ut commodo diam libero vitae erat. Aenean faucibus nibh et justo cursus id rutrum lorem imperdiet. Nunc ut sem vitae risus tristique posuere. uis cursus, mi quis viverra ornare, eros dolor interdum nulla, ut commodo diam libero vitae erat. Aenean faucibus nibh et justo cursus id rutrum lorem imperdiet. Nunc ut sem vitae risus tristique posuere.